| Starmatt Home | The Photographer | Buy Print | Publishers | Contact | Articles | Links | Site Map |
Anti-Vignetting Layer
Matt BenDaniel
What Is Vignetting and How Does It Arise?
Vignetting (AKA light falloff) is present in nearly all astrophotographic systems. Vignetting typically is a darkening of the image away from the center. It can arise from an obstruction or from a wide-angle lens with rectilinear projection. Typical vignetting would yield about one stop difference in response from center to corner.To see how vignetting arises in your system, attach the camera to the telescope and focus on a distant daytime scene. Open the camera back and lock open the shutter. Place your eye at the focal plane in a corner of the frame. Look at the objective. Can you see all of it? No? Then there is vignetting. Observe what obstructs the view. Is it the camera opening? The focuser? The reducer?
It is possible that every astrophoto you have ever taken has had some degree of vignetting. Over the course of years, you may have unconsciously come to expect vignetting, and you stop seeing it. The same is true of the blind spot (fovea) that everyone has in each eye.
On any given optical system, vignetting can be eliminated by using a smaller format or by cropping. However that is usually "throwing away the baby with the bath water."
Some astrophotographers think that vignetting is directly related to incorrect exposure length. Some mistakenly reduce the exposure length in an attempt to make the vignetting less evident. However, if you wish to record adequate signal information in the corners, you need to make sure that the sky background is exposed near to or above the toe of the film's response curve in the corners. Vignetting can be eliminated by post-processing, but signal lost due to underexposure cannot be recovered.
Is Vignetting Bad? In a recent survey of the Astro-Photography Mailing List, 90% of the respondents preferred the unvignetted version of an image. But many of them said they wouldn't have noticed the vignetting if they hadn't been shown the difference. One respondent said he liked subtle vignetting, because it focuses the viewers attention on the center of the field of view.
In most cases, perfectly wonderful images can have a modest amount of vignetting. In other cases, the vignetting is so extreme that the image would be unacceptable without anti-vignetting. One such example is presented below. In the most extreme cases (e.g. an 8-inch SCT with an f/6.3 reducer), the vignetting is so overwhelming that it is impractical to eliminate it during post-processing.
The effect of vignetting on the final image depends in part on how much the image's contrast is increased during postprocessing. For faint targets, one is liable to turn up the contrast a lot, which makes any vignetting very apparent.
Imagers can create highly detailed large fields of view by mosaicking multiple contiguous images (e.g. in RegiStar). Almost universally any visible seams in the result are considered detractors. The separate images must be anti-vignetted in order to create a seamless mosaic.
The Anti-Vignetting Layer
With the proper processing skills, vignetting can usually be eliminated completely, without introducing any artifacts. There are a number of ways to do anti-vignetting (AV).To get the most out of Photoshop, we need to use its layer features. This enables us to modularly add processing steps without corrupting the source image. Photoshop History is very limited. If you head down the wrong path, the History point you want to revert to may be long gone. With layers we can disable any unsatisfactory layer and create a new one. Layers allow revision of processing steps without undoing more recent steps. Layers minimize rework.
In Photoshop you can introduce a layer with a radial gradient (usually with black at the center). However, it is usually difficult to match the exact falloff with a custom gradient. Another trick is to duplicate the image layer, erase the objects of interest, blur it, invert it, and screen it onto the image layer. Beware, Photoshop gaussian blurring sometimes produces "terraced" layers that resemble Newton ring artifacts.
I have refined an AV technique based on manual adjustment of the AV layer. It can be helpful to start with a blank layer or use a radial gradient or blurred image as a starting point. I use a layer with a blending mode of "screen" and an opacity of about 30%. Typically the center of the layer will be totally black, which assures that no adjustment occurs to the center of the image. The screen mode increases the levels of most of the off-center pixels in the source image; the structure of the image is revealed but not significantly altered.
The AV layer and the main curves layer must be developed in tandem. As you refine the curves for the image, you bring out latent luminescence and color variations that can be addressed by the AV layer. You can introduce a temporary curves layer that increases contrast to make differences more apparent. You can use a temporary hues/saturation layer to make color variations more apparent. Once the AV and curves layers are in place, you can click on the AV layer and paint. Observe the changes to the resulting image and adjust accordingly. Note: In my experience a good print reveals more defects than a monitor does. This means you need to be extra critical at the monitor if you intend to print. I prefer not to work out the problems in my images by printing them repeatedly; that is expensive/wasteful on a photo printer with glossy paper.
How are colors selected for inclusion in the AV layer? The foreground color will usually be white with a tint (e.g. 255/240/230). The general approach is to leave the center of the image unadjusted. Whatever color bias the center has should be added to the rest of the image. If that bias is not apparent, then start with a white foreground for the gradient or paint brush. Black is almost always the best color for the background. Adjust the main curves layer to get the best look. If color variations are seen, adjust the foreground color and redraw the gradient. You can adjust an existing AV layer's overall color by using a grouped curves layer (which can be merged down later).
The beauty of this kind of AV layer is that it can do even more than anti-vignetting. It can be used to eliminate an OAG prism shadow. It can be used to even out background color or intensity. Sometimes film does strange things, especially when capturing faint or low contrast subjects.
The AV layer is not a silver bullet. Many source images have undesired non-radial color gradients due to sky glow, hypering, humidity, processing, etc. These can be dealt with by an AV layer, but usually they should not be. I recommend a separate layer for each artifact type. One example would be a green glow that creeps in from the sides of the image. Create a separate layer for each such artifact, perhaps using subtract mode instead of screen mode. If these layers are positioned just above the source layer, they can be merged down when complete.
An AV layer can take a lot of time to refine, but its power is worthwhile. The AV layer can itself be a work of art.
The Witch Head Nebula
The example presented here is a Witch Head Nebula image. Two shots were taken in December 2000 in Southern California. They were taken on an Astro-Physics 105mm f6 refractor on 6x7 hypered PPF film. Two 45-minute exposures were scanned (at 2000 DPI) then stacked in RegiStar. Stacking reduces graininess, especially in faint areas, and this nebula is very faint. The stacked source image (Figure 1) still has very poor signal. Figure 1. Image
After Stacking
Figure 1. Image
After Stacking
When an image has poor signal, one option is, next new moon, to try to photograph the subject again to see if it comes out better. What if it doesn't come out better? Give up? Or post-process?
When solely curves were applied to this image, it was obvious that the vignetting was severe (see Figure 2).
 Figure 2. Without
AV Layer Shows Severe Vignetting
Figure 2. Without
AV Layer Shows Severe Vignetting
I introduced an AV screen layer (see Figure 3), starting with a radial gradient. Using the paintbrush and eraser, I adjusted the AV layer. I typically use a soft brush of radius 300 or 500.
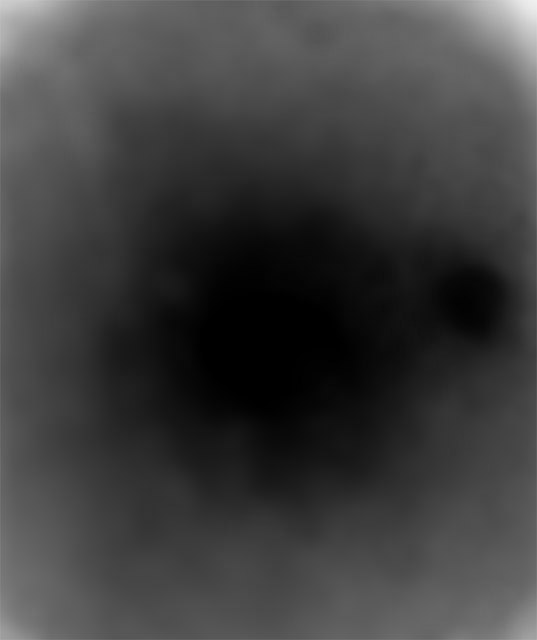 Figure 3. AV
Layer
Figure 3. AV
Layer
Notice that the AV layer is blacked out around Rigel. This is because the region around Rigel was already overexposed. By not increasing the brightness in that area, it reduces the dominance that Rigel has in the image. You may wish to blur the AV layer to smooth any unsmoothness in your manual adjustments. The anti-vignetted image (Figure 4) has almost no vignetting and is smooth across the frame. In this case, I used solely shades of pure gray in the AV layer, but that does not always need to be the case. When an emulsion shows significant differential reciprocity failure, I use a grouped curves layer to establish different curves for each color channel.
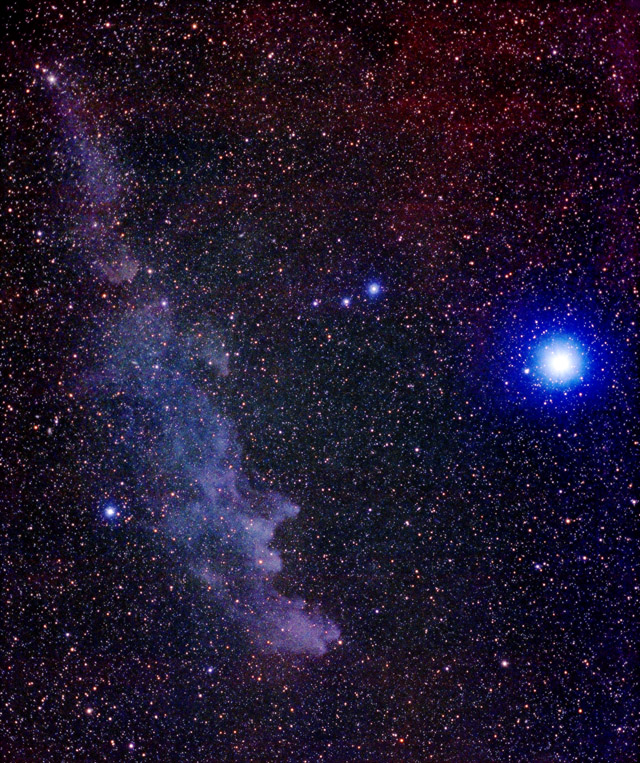 Figure
4. Processed Image with AV Layer
Figure
4. Processed Image with AV Layer
In the above image, one of the benefits of anti-vignetting is that it revealed genuine faint red nebulosity in the upper right. Some scanning artifacts were revealed, too.
Please note that I also shaped the stars, so that the viewer can focus more on the nebula. I also used bgsmooth on Figure 4.
