| Starmatt Home | The Photographer | Buy Print | Publishers | Contact | Articles | Links | Site Map |
Back to Astrophotos

Slides Are Great
We astrophotographers use both color negative and slides films to shoot nebulae, clusters, galaxies and other deep sky objects. Even when we do use slide films like Kodak E200 in the field, rarely are those slides suitable for optimal display by a 35mm projector. The field slides may have significant sky glow, vignetting, and unaesthetic color balance or luminosity profiles. Some astrophotographers use medium format films in the field, which yield better detail, but medium format projectors tends to be odd, primitive, and harder to find.The serious astrophotographer scans raw images at about 2700 DPI, then digitally post-processes them in Photoshop and other software tools. Sometimes multiple images of an object are "stacked", yielding even higher quality. As a result, post-processed images are generally vastly more presentable than raw color images from the field.
Post-processed images are displayed on web pages -- that is, peoples' monitors -- and hi-rez versions are printed on ink jet printers. Sometimes we want to show our work in its full glory to our families and friends, at local astronomy clubs, or at star parties for kids. 35mm slides have an output dynamic range that exceeds prints', and it is practical to display slides on 6 foot by 8 foot screens. Decent used 35mm projectors can be had from eBay for under $50, which cannot be said for LCD projectors. Compared with 35mm slide projectors, overhead (8"x10") slide projectors usually have poorer optical quality; are positioned closer to to the screen and off-axis of it, yielding distortion and uneven focus; cannot be remotely controlled; don't have features like automatic timer advance; and are less portable. These advantages make 35mm slides a better choice for presentations than prints, LCD projectors, computer monitors, and overhead projectors.
How to Make Color 35mm Slides
There are a number of reasonable methods: 1. Write your post-processed digital image files
onto a CD-R or Zip disk. Bring them to your local film lab, and pay $8
per slide. They use a film writer.
2. Mail your CD-R or Zip disk to Tony Hallas for
$7.50 a slide. He uses a better film writer. This takes longer.
3. Make your own slides from a computer monitor
for $0.40 each (including mounting). I discuss this option in detail below.
If you don't have access to a CD recorder drive or a Zip drive, I guess that eliminates options #1 and #2.
1. I brought a few of my post-processed astro images to a local film lab on CD-R. Although it has proven to be an excellent lab for me in every other respect, it turned out that their film writer, a Polaroid ProPalette 8000, was just not up to the task of producing pinpoint stars. In images with rich star fields (like the North America Nebula above), the initially resulting slides had bloated stars that dominated the field, and the nebulosity was much less impressive. The operator did the best he could, but the ProPalette simply was not designed to render astro images. In my opinion, the final slides came out so-so. The operator's efforts to tighten the stars gave some of the images a reddish cast and lost detail.
2. I talked with Tony Hallas, a well known astrophotographer and astrophoto lab operator. He said he never got his ProPalette to work well either, so he sold it in favor of a Lasergraphics Mark VI film writer. Although I have not yet used Tony's film writing service, I believe that his astro slide rendering is better than my local film lab's. Tony can be contacted at http://www.astrophoto.com.
3. The slides I made from my monitor aren't as good overall as the film writer's, but they are good enough for most purposes. This is discussed in detail in the following section.
All of these methods will increase contrast, which is not always good. You can counteract it by reducing the contrast of the source image or of the monitor.
The pricing for options #1 and #2 assumes only one slide per image. The second slide costs $4 or $5. For larger quantities, you may want to use commercial slide reproduction, which costs about $0.45 per slide, with collation, sleeving, numbering and imprinting.
Making 35mm Slides from a Monitor
Obviously, the better the quality of the monitor, the better the result. Also, all else being equal, a large monitor is better. 17 inches is a good size. If the monitor's screen is very curved, it can distort the image.The color temperature of the monitor is very important. In general you want the color temperature of the monitor to match that of the film. Some monitors are permanently set at 9300K, which yields a very blue cast. Your eye probably does not notice it, but it will show up severely on film. 5500K is an appropriate color temperature for daylight film. If the monitor has no color temperature adjustment, you may be able to simulate warming by reducing blue and increasing red levels, using the monitor controls. The brightness and contrast settings of the monitor should be set according to Chuck Vaughn. You may also want to mess with gamma or ICC. For slide shooting, I set my ViewSonic A75s monitor to 100% brightness and 50% contrast. To learn more, read your monitor instruction guide and experiment with its adjustments.
If you cannot make the color adjustments on your monitor, you can use Photoshop's custom display settings. Or, in Photoshop you can either curve each of the images specifically to be photographed on screen. Or, you can use a filter on your lens. Usually an appropriate filter is an FLD, which is magenta colored.
The monitor screen should be clean.
Adjust your Windows (or Mac) screen resolution to the highest you can. I set mine to 1280x1024 and 32 bits per pixel "True Color". If you have to use a slower refresh rate, that's OK. You may also want to hide your Windows Taskbar.
Open your high resolution image in Photoshop (or whatever tool you use). Try to use most of the screen for image display. In Photoshop you can get full screen display by typing the letter "f" once or twice, then "tab" one or twice, then "control-zero". (Hit "tab" and/or "f" again to leave that mode). If your zoom factor is more than 100%, lower it to 100%. Make sure to move the mouse cursor into a corner. The image is ready to be photographed.
(Some monitors' pixels are not square. If you really need to have perfectly calibrated X-Y scaling, you might need to proportionally size your images in Photoshop.)
Set up a tripod such that the camera is on center and level with the monitor. Make sure the tripod knobs are tight. I prefer an Olympus 135mm f/4.5 lens for this work. Its long working distance minimizes screen distortion and gives me enough room to get to the keyboard without knocking the tripod. I use a lens hood.
My favorite film is E200, but any ISO 50-200 E-6 film should be fine.
You'll need to figure out your camera viewfinder's field of view (FOV). My viewfinder FOV is 97% of the film's FOV. This means I need to crop the frame a little tight. I move the tripod backwards or forwards to do this. If I position too far out, after development I'll see a black strip on one or more edges of the slide. Although zoom lenses allow for easy FOV adjustment, zoom lenses simply do not produce images as good as fixed focal length lenses. A focusing rail is the perfect tool for this job, but not many folks have one. Some cameras viewfinders show even less than 90% of the film's FOV. I have used cameras where the viewfinder FOV is actually larger than the film's. You want both the monitor and camera in portrait mode. Usually you will be more constrained in the vertical dimension.
You will want to use a minimum exposure time of 0.5 seconds, to avoid monitor scan artifacts. Up to several seconds should be fine. One second worked pretty well for all my shots. Use the camera's manual exposure mode.
What f-stop should you use? Well, that's going to take some experimentation. I use a range of f/8 to f/22, depending on the image. A high f-stop is good, because it obtains more depth of focus; the entire screen can be in focus even if it is curved. However if you are at the lens's highest f-stop, you may lose fidelity due to diffraction. You should bracket your shots at least one full stop, or two stops by thirds if you're highly motivated. You can use the camera's light meter or a hand held one to get a baseline.
Obviously you don't want anything moving during the exposure. You should use mirror lock-up and aperture pre-fire if you have it. My OM-4T does both if I set the self timer. That means I need to wait 12 seconds for the shutter to fire, but I don't need to use a cable.
Before you open the shutter, close all the shades and turn off all the lights. You don't want reflections on the slide. In fact, if you have windows in the room, the shooting is best done at night. Even a glowing LED in the room can reflect off the monitor surface.
You probably won't get the slides right on your first try. But you might on your second try if you take good notes.
How Do They Compare?
| Aspect | Screen Shot | ProPalette Film Writer |
| Effort | Get a roll of film, set up camera, display images on screen, shoot | Get a blank CD-R, prepare images (they need to be cropped to a 2:3 aspect ratio), write onto CD-R |
| Grain | The pixels (or phosphors) on the screen shots barely show in a 4x loupe, but in a 20x loupe they are obvious (see scans below). If the pixels are a problem, one option is to use a diffusion filter on the camera lens. | The ProPalette writes at 8000 DPI, so the only graininess I see in those slides is from my field film, and much of that grain got lost somehow. |
| Color Balance | Totally under my control. Once I got the 5500K color temperature right, the balance was excellent. | Good on most slides. Some slides had a red cast from the curving that the operator used to reduce star size. |
| Turnaround | 12 hours | 48 hours |
| Cost | $0.40 per slide | $8.00 per slide |
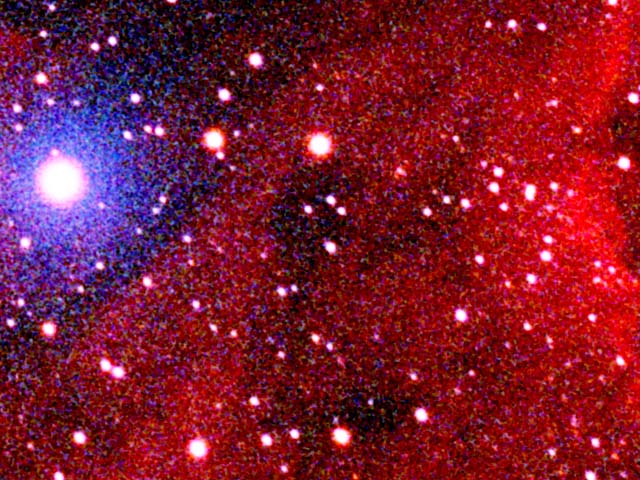 |
Image A. This is a "magnified" 640x480 section from the master post-processed 4000 DPI scan, centered on the "Pelican's eye" from the image above. This is from the source post-processed 5000x3400 digital image, which is the source for the display during the screen shots. However, the camera does not "see" the image at this resolution, because the display has only 1280x1024 pixels, much fewer than the source image has. |
 |
Image B. In Photoshop, I resized the entire image to 1280x1024 (my display resolution), then I resized it back up to the original size, and cropped this section. This is only to illustrate what a display's undersampling does to an image. I did not do this during the slide shooting. |
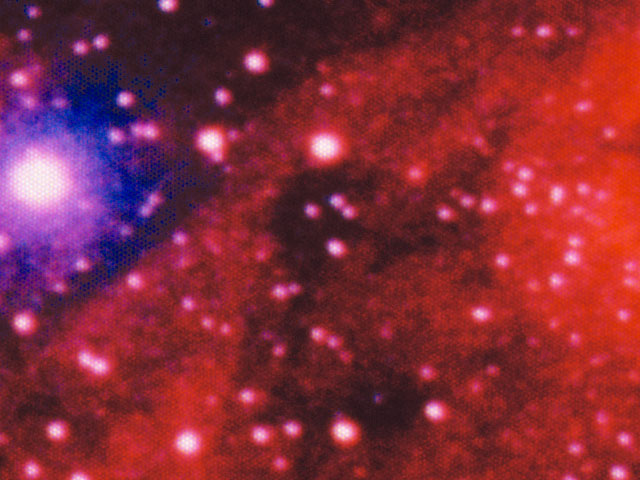 |
Image C. This was from the resulting slide that was photographed
from the screen. As you can see, the process is lossy, both in resolution
and dynamic range. The screen shot was exposed for 1 second at f/16, using
6500K on E200.
Images C & D do not look as nicely here as the backlit slides do. Both Images C and D are manually curved non-linearly to make them more comparable. |
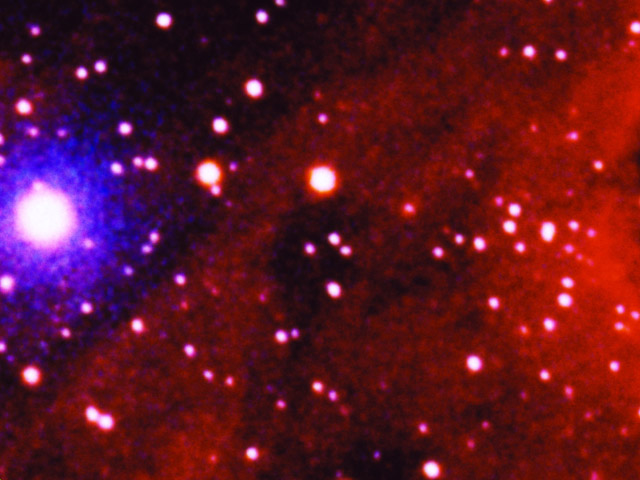 |
Image D. This is from the slide written by the Polaroid ProPalette 8000. This is lossier than I would have expected, since it was made from the hi-rez digital master (Image A). I think the operator used blurring to reduce star size. |
Additional Info
http://thorin.adnc.com/~cymarron/monitor/index.htmhttp://www.digidot.com/sean_homepage/crt/photocrt.html
http://www.artzonephoto.com/artzone/filterzone/temperat.htm
http://cybaea.com/photo/color-correction.html
